jeffers resto
-
mick 63

- Posts: 911
- Joined: Thu Nov 12, 2009 7:20 pm
- Location: Lancaster,Lanc's.
Re: jeffers resto
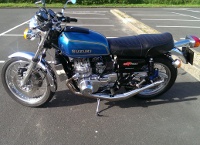
Hi looking at the photos of your tank i can't see the holes for mounting the badges it looks smooth as though they have been filled in and painted over?, the holes are threaded to take the screws for the badges no inserts etc, cheers Mick.
-
astrax
- Posts: 1182
- Joined: Sun May 02, 2010 12:22 am
- Location: Hampshire
- Contact:
Re: jeffers resto
Screw holes should be something like below, the screw holes in the plate attached to the tank.jeffers wrote:ok, the wording was incorrect and sounded a bit daft, the fixing holes in the tank, should they have an insert or something, are the holes threaded, what are the screws meant to screw in to? there doesn't appear to be anything for the screws to bite on. i don't want to wreck the tank or the new paintwork, anyone?
Your tank does look very nice, but chances of finding the holes without any damage will be difficult bordering on almost impossible.
Options
1. As one of the guys said glue or stick the tank badges on, and then glue the small screws in the holes so doesn't look odd, will have file or hacksaw off the thread so only the head of screw is glued in.
2. Use self adhesive transfer Suzuki badges, ( paper thick ones )
3. Send it back to the guy and get him to make it good.
- Attachments
-
-
mark.read3

- Posts: 2733
- Joined: Tue Jun 23, 2009 5:30 pm
- Location: Great Barr , Birmingham
- Contact:
Re: jeffers resto
Am i the only one to be able to see the tank badge holes (after expanding the image that is).
I think this is possible with a great deal patience,skill and luck.
Did one a few years ago by needling in jb weld into the holes after first deepening and expanding the holes slightly to get some filler out expose some metal parts(still rate that stuff after all these years).Leave to go off for a day.
Then i overlayed and taped on the tank badges making sure the badge holes lined up on the jb weld.
Dremmel on low speed with small drill,sorry cant remember the size but i'm sure you'll work it out was my weapon of choice.
Lastly i tapped the holes out.Again i cant remember the tap size its been that long ago.
Job done and was perfect.Looking back if i could have found self tapping screws they might have done just as good a job, but if times not the issue then go down the tapping route.
Mark
-
astrax
- Posts: 1182
- Joined: Sun May 02, 2010 12:22 am
- Location: Hampshire
- Contact:
Re: jeffers resto
Mark, Well spotted, I thought it was a reflection of the flash, coming off the corner edge of the side panel reflection, if that makes sense ?mark.read3 wrote:Am i the only one to be able to see the tank badge holes (after expanding the image that is).
I think this is possible with a great deal patience,skill and luck.
Mark
If that's the case, agree can chip out the filler from the threads 2mm drill should do clear it out, and if you twist it between your finger and thumb then shouldn't damage the fine threads.
I think it is is tapped M2.5
Unfortunately I don't have a tap that size that I could lend you, M3 is the smallest I have.
Good luck.
-
jeffers
- Posts: 36
- Joined: Sun Dec 05, 2010 2:30 pm
- Location: macclesfield cheshire
Re: jeffers resto
thanks guys, some ides to work with there. getting hold of the die wont be an issue, will crack on today.
thanks
Geoff
thanks
Geoff
-
jeffers
- Posts: 36
- Joined: Sun Dec 05, 2010 2:30 pm
- Location: macclesfield cheshire
Re: jeffers resto
sorted the tank emblem issue by getting rid of the filler, the screw supplied with the emblems were defo too short, got some longer set screws and cut down to fit. anyway updated pic attached
- Attachments
-
-
jeffers
- Posts: 36
- Joined: Sun Dec 05, 2010 2:30 pm
- Location: macclesfield cheshire
Re: jeffers resto
Help....
just starting to overhaul the gearbox, major problem in that 3rd 4th & 5th gears, both drive and driven gears are worn and in need of replacement, 3rd and 4th driven are damaged,
just checked on the crooks website and it says they are obsolete. what now, any ideas apart from try to track down another used gearbox on ebay or the like?
thanks for looking
Geoff
-
BAZ

- Posts: 3599
- Joined: Thu Jun 18, 2009 7:35 pm
- Location: Dudley west midlands
- Contact:
Re: jeffers resto
It may be best to find another gearbox there seems to be plenty around maybe someone on the forum has one. Can you post a high quality picture of the teeth so I can see how bad.
http://www.kettleclinick.com/viewtopic.php?f=14&t=1118
http://www.kettleclinick.com/viewtopic.php?f=14&t=1118
-
jeffers
- Posts: 36
- Joined: Sun Dec 05, 2010 2:30 pm
- Location: macclesfield cheshire
Re: jeffers resto
Baz
will try to get some pics this week, i am a little immobilised at present following a hip replacement, but will get to it this week. only just getting mobile, to get to it i have to shift a BMW 1200GS and my wr250, not easy at the moment.
many thanks
Geoff
will try to get some pics this week, i am a little immobilised at present following a hip replacement, but will get to it this week. only just getting mobile, to get to it i have to shift a BMW 1200GS and my wr250, not easy at the moment.
many thanks
Geoff
-
Mr.P

Re: jeffers resto
I might have some spare gearbox bits post up a picture of the part you want and the good news I live in Bramhall just up the road.